Turn Off Navigation Pane In Word For Mac
Microsoft features a tool called the Navigation Pane in Word 2013 that provides a convenient location for you to navigate through your document. You may have gotten used to using it, only to open Word one day and find that it is gone. The Navigation Pane is an optional part of the Word 2013 layout, and it can be hidden from the program at any time.
So if you want to use the Navigation Pane for your document, but it is currently hidden, then you can follow the steps below to open it and display it at the left side of the Word window.

Format tab that appears on the right end of the ribbon, and then, in the Arrange group, choose Selection Pane. Select one or more items in the list. (Use Ctrl+Click to multi-select). Drag the selection upward or downward, or click the up (Bring Forward) or down (Send Backward) arrow.
Show the Navigation Pane in Word 2013
The steps in this article will open the Navigation Pane at the left side of the window in Word 2013. You can use similar steps to open the navigation pane in word 2010. If you find later that you do not like using the Navigation Pane, then you can click the x at the top right corner of the pane, or you can follow the same steps below to remove the check mark from the box instead of add it.
- Open your document in Word 2013.
- Click the View tab at the top of the window.
- Check the box to the left of Navigation Pane in the Show section of the ribbon.
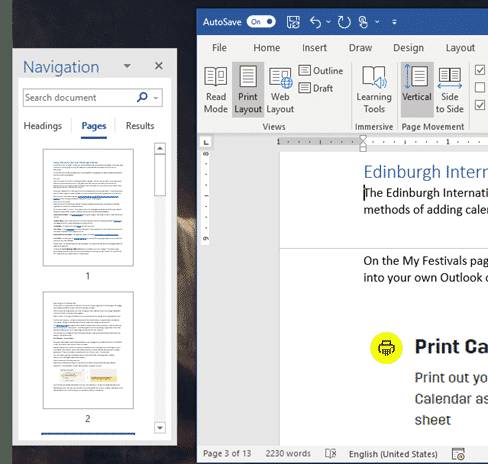
The Navigation Pane should now be open at the left side of the window.
You can enter search terms into the Search field, or you can click the Headings, Pages or Results options for ways to navigate through your document. Note that the visibility of the Navigation Pane is something that is remembered in the Word application, so if you open the Navigation Pane in one document, and don’t closeit, then it will be open and visible for the next document that you open in Word 2013.
Microsoft Word 2013 has a lot of great grammar and spelling tools that can help fix problems in your document. For instance, learn how to check for passive voice in Word 2013 and find instance where you have written in the passive voice so that you can fix them.
Disclaimer: Most of the pages on the internet include affiliate links, including some on this site.
Microsoft Word 2010 enables you to move around your document through different ways. You can use Navigation Pane to find word,objects and text in your document. Also, you can directly jump to specific page and headings. Below screenshot shows you how to use navigation pane.
1) You can open the navigation pane by just clicking on the button in the editing group right at the home tab. Although you can use the shortcut key by simply pressing the combination of CTRL + F keys we have shown this in below screen image.
2) By default, the navigation pane opens up at the left side of Microsoft word. You can enter the text in the edit box you wish to find. Word shows the matching results automatically. You will find a small thumbnail display for every occurrence found in your word document. You need to click on the particular thumbnail in order to jump to that occurrence. Word temporarily highlights the occurrence. This feature allows you to spot the text you are searching. Same scenario is shown in below screenshot.
3) You can search word document elements and objects, such as tables, equations, graphics, and endnotes, etc. To perform this task, you need to press down arrow on the right side of the search edit box. So, under the find you need to type the object you want to search as shown below.
4) There are many options by which you can customize the find. In order to set these options, you need to click on the down arrow to the right side of the search edit box.
5) A dialog box appears. You can check the boxes in order turn off or on your particular options. Click on the As Default and then press OK you don’t want specific options to turn on or off.
Situs download film kartun bahasa indonesia. Salah satu situs download film gratis yang sering dikunjungi adalah Bioskop Keren. Namun, situs ini punya bebeapa alamat alternatif karena menjadi incaran Kemenkominfo, geng. Di situs sini, kamu bisa download movie sub Indonesia yang keren dan seru untuk bisa ditonton sendiri atau bareng temen.
6) You can use the down arrow in order navigate to specific phrase or word. Whereas, the up arrow can take you to the last search results in the whole document. You can find it in below screenshot.
7) You can also jump to the various sections of your document in case if you have used some built-in styles such as headings, etc.
8)In order to display thumbnails of all the pages in your word document, you need to click on the next tab to the right.
9) If you would like to use the classic find, then you need to click on the down arrow to the right side of search edit box and choose advanced find from the dropdown menu. We show you in the below screenshot.
10) Word 2010 allows you to select to find certain types of formats including some text formatted phrases with unique fonts and paragraph styles. By simply clicking on the special button, you may search various special marks and characters. However, you can use the replace tab instantly using the same drop-down menu access through navigation pane that will opened the find tab on the find and replace dialog box.
11) If you want to jump to particular section or page number, you can go to tab on find and the replace dialog box will allow you to do this.
12) You can close the navigation pane by clicking on the down arrow as shown in below screenshot. Also use that menu to resize and move the pane.
In word 2010, Microsoft has improved the features related to navigation and search by making it much easier for user to move around the document and find various elements, such as text, special characters, and styles.
For more Microsoft Word Tutorials, subscribe to our RSS feed.